Introduction
Welcome to our comprehensive guide on sharpening garden tools! Whether you’re a seasoned gardener or just starting out, maintaining sharp tools is essential for efficient and effective gardening. In this guide, we will delve into the importance of tool maintenance, the benefits of sharp tools, and the step-by-step process of sharpening various garden tools.
Importance of Sharp Garden Tools
Gardening is not just a hobby; it’s a craft that requires precision, care, and the right tools. Among these tools, sharp garden tools play a crucial role in ensuring your garden thrives and stays healthy. Let’s delve into why keeping your garden tools sharp is of utmost importance.
The Edge of Efficiency
Sharp garden tools are akin to skilled hands in the garden. They cut through branches, trim hedges, and dig into the soil with ease and precision. When your tools are sharp, you’ll find your tasks completed more efficiently, allowing you to focus on the artistry of gardening.
Promoting Plant Health
Using dull tools on your plants can do more harm than good. Ragged cuts on branches can leave them vulnerable to diseases and pest infestations. Sharp tools, on the other hand, create clean cuts that promote quick healing and reduce stress on your plants.
Enhancing Safety
A sharp tool is not just efficient but also safer to use. Dull tools require more force, increasing the chances of slips and accidents. Keeping your garden tools sharp reduces the risk of injuries, making your gardening experience safer and more enjoyable.
Prolonging Tool Lifespan
Regularly sharpening your garden tools is a way of caring for them. Dull tools require more effort to use and are more prone to damage. By keeping them sharp, you extend their lifespan and ensure they remain effective for years to come.
Remember, a sharp garden tool is not just a tool—it’s an extension of your gardening prowess. Investing time in sharpening your tools is investing in the health and beauty of your garden.
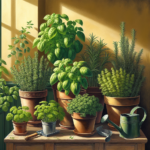
Types of Garden Tools
Gardening requires a variety of tools to ensure your plants and garden thrive. Understanding the different types of garden tools available can help you choose the right ones for your gardening needs.
1. Digging Tools
Digging tools are essential for tasks like breaking up the soil, planting, and transplanting. Examples of digging tools include:
- Spade: Ideal for digging, edging, and planting.
- Shovel: Great for moving soil, gravel, or other materials.
- Trowel: Perfect for planting small flowers or digging in tight spaces.
2. Pruning Tools
Pruning tools are vital for maintaining the health and appearance of your plants. Common pruning tools include:
- Pruning Shears: Used for cutting branches and stems.
- Pruning Saw: Ideal for cutting through larger branches.
3. Watering Tools
Watering tools are crucial for keeping your plants hydrated. Some essential watering tools are:
- Watering Can: Perfect for gentle watering of plants.
- Hose: Convenient for watering larger areas of the garden.
4. Weeding Tools
Weeding tools help you maintain a weed-free garden. Common weeding tools include:
- Weeder: Great for removing weeds with long taproots.
- Hand Fork: Ideal for loosening soil and removing weeds.
5. Cutting Tools
Cutting tools come in handy for various garden tasks. Some essential cutting tools are:
- Garden Scissors: Useful for trimming herbs, flowers, and small plants.
- Hedge Shears: Perfect for shaping hedges and shrubs.
Having the right garden tools can make your gardening experience more efficient and enjoyable. Choose the tools that best suit your gardening style and needs.
Pruning Shears
Introduction to Pruning Shears
Pruning shears are essential tools for maintaining the health and appearance of your garden plants. These specialized cutters are designed to make precise cuts on branches and stems, promoting new growth and overall plant vigor.
Types of Pruning Shears
There are several types of pruning shears available, each suited for specific pruning tasks:
- Bypass Pruners: Ideal for cutting live branches with their sharp, scissors-like blades that overlap.
- Anvil Pruners: Suitable for cutting dead wood due to their single blade that closes onto a flat edge.
- Ratchet Pruners: Designed for easier cutting of tough branches by utilizing a ratcheting mechanism.
Sharpening Your Pruning Shears
Regularly sharpening your pruning shears is crucial for maintaining their cutting efficiency and prolonging their lifespan. Follow these steps to sharpen your pruning shears:
- Clean the blades: Remove any sap or residue from the blades using a cloth soaked in rubbing alcohol.
- Use a sharpening tool: Use a sharpening stone or file to carefully sharpen the beveled edge of the blade.
- Check the alignment: Ensure the blades are properly aligned and adjust if necessary to ensure a clean cut.
Maintaining Your Pruning Shears
Proper maintenance of your pruning shears is essential for smooth operation:
Regularly oil the pivot point and the blades to prevent rust and ensure smooth cutting.
When to Replace Your Pruning Shears
Knowing when to replace your pruning shears is important for efficient gardening:Signs it’s time to replace: – Blunt blades that crush rather than cut branches – Broken or bent blades that cannot be realigned – Excessive rust or corrosion
Shovels and Spades
When it comes to essential gardening tools, shovels and spades are indispensable for a variety of tasks. From digging to transplanting, these sturdy tools are a gardener’s best friend. Understanding the differences between shovels and spades can help you choose the right tool for the job.
Shovels vs. Spades
While shovels and spades may appear similar at first glance, they serve different purposes in the garden.
- Shovels typically have a curved blade, which is ideal for moving materials such as soil, mulch, or gravel. They are designed for lifting and tossing rather than cutting into the ground.
- Spades, on the other hand, have a flat, straight blade that is perfect for cutting through soil and slicing through roots. They are more efficient for digging and edging.
Choosing the Right Tool
When selecting between a shovel and a spade, consider the type of work you will be doing:
- If you need to move loose materials or work on tasks that involve lifting and tossing, opt for a shovel.
- For digging, cutting through compacted soil, or edging around plant beds, a spade is the better choice.
Maintenance Tips
To keep your shovels and spades in top condition:
- Keep the blades sharp: Regularly sharpen the edges of your tools to ensure clean cuts and efficient digging.
- Clean and dry: Remove any dirt or debris after each use and store your tools in a dry place to prevent rust.
- Handle care: Inspect the handles for any signs of damage and replace or repair them as needed to maintain a sturdy grip.
By understanding the nuances between shovels and spades and properly maintaining your tools, you can enhance your gardening experience and achieve better results in your garden.
Hoes and Edgers
Hoes for Efficient Gardening
Hoes are versatile tools useful for chopping, weeding, and cultivating soil. When choosing a hoe, consider the type of gardening tasks you primarily perform.
- Standard Garden Hoe: Ideal for general-purpose weeding and soil cultivation.
- Scuffle Hoe: Perfect for cutting weeds just below the soil surface without disturbing the soil.
- Warren Hoe: Great for slicing through soil and digging narrow furrows for planting.
Edgers for Neat Garden Boundaries
Edgers are essential for creating clean and defined boundaries between different sections of your garden. Whether it’s between lawn and flower beds or pathways and gardens, an edger helps maintain a polished look.
Consider the following aspects when choosing an edger:
- Manual vs. Powered: Decide between a manual rotary edger for precision or a powered lawn edger for larger areas.
- Blade Type: Look for high-quality steel blades that can create sharp, clean edges.
- Adjustability: Opt for an edger with adjustable depth settings for versatility in creating different edge styles.
Tools for Sharpening
Essential Equipment
Having the right tools for sharpening is crucial to achieving optimal results. Here are some essential items for sharpening your garden tools:
- Sharpening Stone: A quality sharpening stone is a must-have for maintaining sharp edges on your tools.
- File: Useful for sharpening larger garden tools such as axes and hoes.
- Sharpening Jig: An adjustable sharpening jig helps maintain the correct angle while sharpening.
Sharpening Techniques
Sharpening garden tools requires a gentle touch and the right technique for each specific tool. Here are some general tips to keep in mind:
- Consistent Angle: Maintain a consistent angle when sharpening to ensure a uniform edge.
- Smooth Motions: Use smooth, even motions when sharpening to prevent uneven edges.
- Regular Maintenance: Regularly sharpen your tools to prevent excessive wear and tear.
Sharpening Safety
While sharpening your garden tools, safety should always be a top priority. Remember these safety tips:
- Wear Gloves: Protect your hands with gloves to prevent accidental cuts.
- Eye Protection: Use safety goggles to shield your eyes from any flying debris.
- Stable Surface: Work on a stable surface to prevent accidents while sharpening.
Files
Types of Garden Tool Files
When it comes to sharpening your garden tools, having the right file is essential. Here are some common types:
- Rasp files: Ideal for rough shaping and quick material removal.
- Mill files: Great for sharpening axes, hoes, and spades.
- Round files: Perfect for sharpening chain saws and curved blades.
Choosing the Right File
Selecting the appropriate file depends on the tool you are sharpening. Remember:
“Using the correct file for each tool ensures a precise and effective sharpening process.”
Proper File Maintenance
Just like your garden tools, files require maintenance too. Follow these tips:
- Clean after each use: Use a wire brush to remove debris and prevent clogging.
- Store properly: Keep files in a dry place to avoid rusting.
- Regular inspection: Check for any damage or dulling to ensure optimum performance.
Whetstones
Whetstones are essential tools for maintaining the sharpness of your garden tools. Understanding the different types of whetstones and how to use them effectively is key to achieving excellent results. Let’s delve into the world of whetstones and discover their significance in sharpening garden tools.
Types of Whetstones
- Oil Stones: These traditional whetstones use oil as a lubricant to remove metal particles during sharpening.
- Water Stones: Known for their fast cutting action, water stones require soaking before use and are versatile for various tools.
- Diamond Stones: Made of industrial diamonds, these stones offer durability and are ideal for honing hard steel tools.
Choosing the Right Whetstone
When selecting a whetstone, consider the following factors:
- Grit Size: Coarse grit for reshaping and repairing, medium grit for regular sharpening, and fine grit for polishing.
- Stone Material: Each type of whetstone has its advantages, so choose based on your tool sharpening needs and preferences.
- Size and Thickness: Ensure the whetstone dimensions suit the tools you plan to sharpen.
Using Whetstones
Follow these basic steps for sharpening your garden tools with a whetstone:
- Preparation: Soak water stones if required, lubricate oil stones, and secure the whetstone in place.
- Angle: Maintain a consistent angle between the tool blade and the whetstone to achieve the desired sharpness.
- Technique: Use smooth, overlapping strokes to sharpen the blade evenly along the entire edge.
- Finishing: Complete the process with finer grit stones for a polished, razor-sharp edge.
Tips and Tricks
“Consistent practice and patience are key to mastering the art of using whetstones effectively. Take your time and enjoy the process of transforming dull tools into precision instruments.”
With the right whetstone and proper technique, you can ensure that your garden tools remain sharp and ready for any task that comes their way.
Sharpening Stones
When it comes to sharpening your garden tools, sharpening stones play a crucial role in achieving that perfect edge. These trusty tools help you maintain the sharpness of your implements, ensuring clean cuts and efficient gardening. Let’s delve into the world of sharpening stones and how they can elevate your gardening experience.
The Importance of Quality Stones
Quality is paramount when choosing sharpening stones. Opt for stones made of durable materials that offer varying levels of abrasiveness to suit different tools and sharpening needs. A fine-grit stone can help refine the edge, while a coarser stone can tackle more intensive sharpening tasks.
Choosing the Right Grit
Understanding the grit of a sharpening stone is essential. Lower grit numbers signify coarser surfaces, ideal for repairing damaged edges, while higher grit numbers are great for polishing and refining the edge. Having a combination of different grit stones allows you to cover all sharpening requirements.
Maintaining Your Stones
Proper maintenance of sharpening stones prolongs their effectiveness. Regular cleaning and flattening of the stone surface ensure consistent sharpening results. Additionally, using honing oil or water as a lubricant enhances the sharpening process and prevents clogging of the stone pores.

Storing Your Stones
Proper storage is key to maintaining the integrity of sharpening stones. Keeping them in a dry environment away from moisture prevents warping or cracks in the stone surface. Invest in protective cases or boxes to safeguard your stones when not in use.
Sharpening stones are not just tools; they are the gateways to precision and efficiency in your gardening endeavors. By understanding the nuances of these stones and giving them the care they deserve, you equip yourself with the means to achieve pristine edges that make your gardening tasks a breeze.
How to Sharpen Garden Tools
Keeping your garden tools sharp is essential for maintaining a thriving garden. Blunt tools can damage plants and make your work harder than necessary. Here’s a comprehensive guide on how to sharpen your garden tools effectively.
Gather Your Tools
Before you begin sharpening, make sure you have the necessary tools handy:
- Whetstone or file: for sharpening blades
- Protective gloves and goggles: for safety
- Rag: for cleaning the tools
Sharpening Process
- Clean the Tools: Use a rag to wipe off any dirt and debris from the tools.
- Secure the Tool: Place the tool in a vise or clamp to keep it steady during sharpening.
- Angle the Blade: Maintain the original angle of the blade while sharpening to ensure optimal cutting performance.
- Sharpening Technique: Use smooth and consistent strokes along the blade, ensuring even sharpening.
- Test the Sharpness: Test the sharpness of the tool by cutting through a piece of paper or a small branch.
Specific Tool Tips
Pruners and Shears: You can use a sharpening stone to maintain a clean edge on the blades. Take care not to sharpen them too aggressively. Lawn Mower Blades: Remove the blades from the mower before sharpening. Use a file to sharpen at the correct angle for a clean cut. Shovels and Hoes: Focus on sharpening the cutting edge of shovels and hoes to make digging easier and cleaner.
Maintenance Tips
Regular maintenance is key to keeping your garden tools sharp:
- Clean tools after each use: Remove dirt and sap to prevent corrosion.
- Oil metal parts: Apply a thin coat of oil to prevent rust formation.
- Store tools properly: Keep tools in a dry place to maintain their sharpness.
By following these steps and tips, you can ensure that your garden tools are always sharp and ready for use, making your gardening tasks more efficient and enjoyable.
Step-by-Step Guide
Follow these detailed steps to sharpen your garden tools effectively:
Gather Your Tools
Before starting, ensure you have the necessary tools at hand:
- Gloves: Protect your hands from sharp edges.
- Garden Tool Sharpener: Choose the appropriate type for your tools.
- Wire Brush: For cleaning off debris and rust.
Clean Your Tools
Use a wire brush to remove any dirt, sap, or rust from the blades of your tools. Cleaning them beforehand ensures a smoother sharpening process.
Sharpening Process
- Secure the Tool: Place it in a vise or clamp to hold it steady.
- Angle: Follow the original bevel angle of the tool for sharpening.
- Sharpening: Run the sharpener along the blade in smooth motions, maintaining a consistent angle.
- Test: Check the sharpness by cutting through a piece of paper or cardboard.
Finishing Touches
After sharpening, wipe the tools clean and apply a light coat of oil to prevent rust. Store them in a dry place for future use.
Maintenance Tips
Regular maintenance is key to keeping your tools in top condition. “A sharp tool is a safe tool,” as they say.
By following these steps diligently, your garden tools will be sharpened and ready for any gardening task that comes your way.
Safety Precautions
Proper Attire
When sharpening garden tools, always wear protective gloves to prevent any accidents. Additionally, protective eyewear should be worn to shield your eyes from any metal filings or debris.
Stable Work Surface
Ensure that you have a stable work surface when sharpening your tools. A solid bench or table will provide a safe and secure area to work on without any wobbling or movement.
Tool Inspection
Before sharpening any tools, inspect them for any damage or faults. Do not sharpen tools that are cracked, broken, or compromised in any way as this can lead to further accidents.
Proper Technique
Follow proper sharpening techniques for each specific tool to prevent injuries. Improper sharpening methods can not only damage the tool but also increase the risk of accidents during use.
Clean Workspace
Keep your workspace clean and organized. Cluttered areas can lead to accidents, so make sure to tidy up and properly store all tools and sharpening equipment after use.
Secure Tools
When sharpening tools, always secure them properly to prevent any slipping or unexpected movements. Use clamps or vices to hold the tool in place securely during sharpening.
Additional Tips for Maintenance
Keeping your garden tools in top condition is essential for their longevity and optimal performance. Here are some additional tips to help you maintain your tools effectively:
Regular Cleaning
Make sure to clean your tools after each use to prevent rust and corrosion. Use a mixture of water and mild detergent to gently remove dirt and debris. Dry thoroughly before storing to prevent damage.
Sharpening Techniques
- Regularly sharpen your tools to ensure clean cuts and efficient performance. Use a sharpening stone or file to maintain a sharp edge.
- Remember to follow the manufacturer’s guidelines for sharpening specific tools to avoid damaging them.
Proper Storage
Store your garden tools in a dryandwell-ventilated area to prevent rust and moisture damage. Consider hanging them on a pegboard or using a tool rack for easy access.
Oil Application
Regularly apply a thin coat of oil to the metal parts of your tools to protect them from corrosion. This simple step can greatly extend the lifespan of your gardening implements.
Cleaning and Storage
Cleaning Your Garden Tools
Properly cleaning your garden tools is essential to ensure their longevity and efficiency. Here are some steps to follow:
- Remove Debris: Before cleaning, remove any dirt, mud, or plant residues from the tools using a brush or cloth.
- Washing: Wash the tools using warm soapy water to remove stubborn dirt or sap. For metal tools, dry them immediately after washing to prevent rust.
- Disinfecting: To prevent the spread of diseases between plants, disinfect your cutting tools using a solution of equal parts water and rubbing alcohol.
- Oiling: After cleaning, apply a light coat of oil to metal parts to prevent rust and keep the tools moving smoothly.
Storing Your Garden Tools
Proper storage is crucial to maintain the sharpness and quality of your garden tools. Follow these tips for effective tool storage:
- Hang Tools: Hang larger tools such as rakes and shovels on a wall rack to prevent them from lying on the ground and accumulating moisture.
- Protective Cases: Store smaller hand tools in protective cases or toolboxes to prevent damage and make them easy to find.
- Clean Before Storage: Always clean and dry your tools before storing them to prevent rust and mold growth.
- Avoid Humid Areas: Store your tools in a cool, dry place away from direct sunlight and humidity to maintain their quality.
Regular Inspections
Regular inspections of your garden tools are essential to ensure they are in optimal condition for use. By incorporating these inspections into your routine, you can prolong the lifespan of your tools and maintain their performance. Below are key points to consider when conducting regular inspections:
Visual Check
- Inspect the tools for any signs of damage, such as chips, cracks, or rust.
- Check for any loose or missing parts that may affect the tool’s functionality.
- Pay special attention to the handles for any splintering or wear.
Sharpness Assessment
Ensuring your garden tools are sharp is crucial for efficient and effective use. Blunt tools can cause more harm than good and make your tasks more laborious. Use the following guidelines:
- Run your fingers along the tool’s edge to feel for any nicks or dull spots.
- Perform a paper test by attempting to cut a piece of paper with the tool.
- Keep a sharpening tool handy to address any dullness promptly.
Handle Inspection
“A well-maintained handle ensures a safe and comfortable grip while using your garden tools.”
Follow these steps to inspect the handles of your tools:
- Check for cracks or splinters that could cause injury during use.
- Ensure the handles are securely attached to the tool without any wobbling.
- Consider applying a protective coating to wooden handles to prevent damage.
Storage Evaluation
Proper storage helps prevent damage and extends the life of your garden tools. Consider the following:Cleanliness: Remove any dirt or debris from the tools before storing them. Humidity: Store tools in a dry area to prevent rust and corrosion. Organization: Arrange tools neatly to avoid unnecessary strain or damage.
Conclusion
In concluding our discussion on how to sharpen garden tools, it is essential to emphasize key takeaways and reminders for maintaining well-sharpened tools that enhance gardening efficiency and results.
Key Points to Remember:
- Regular Maintenance: Sharpening your garden tools regularly ensures optimal performance and prolongs their lifespan.
- Proper Technique: Using the correct sharpening technique for each tool type is crucial for effective results.
- Safety First: Always prioritize safety by wearing appropriate protective gear when sharpening tools.
- Quality Sharpening Tools: Investing in high-quality sharpening tools can make the sharpening process more efficient.
Collaborate and Share:
Don’t hesitate to collaborate with fellow gardeners or seek advice from professionals on advanced sharpening techniques. Sharing knowledge can enrich everyone’s gardening experience.
Continuous Improvement:
Remember that sharpening garden tools is not a one-time task but an ongoing process. Regularly assess the sharpness of your tools and refine your sharpening skills over time.
Enjoying Your Sharp Garden Tools
Keeping your garden tools sharp not only makes your gardening tasks more efficient but also extends the lifespan of your tools. With properly maintained tools, you can enjoy a seamless gardening experience filled with precision and ease. Here are some tips to help you fully enjoy the benefits of sharp garden tools:
Regular Maintenance Routine
Set aside time for regular maintenance of your garden tools. Clean them after each use to prevent rust and dirt buildup, and sharpen them when needed. A routine maintenance schedule will ensure your tools are always ready for action.
Sharpening Techniques
Learn the proper sharpening techniques for different tools. Whether you are sharpening shears, pruners, or shovels, using the correct tools and methods is crucial. Research or seek guidance to sharpen each tool effectively.
Proper Storage
Store your sharp garden tools properly to prevent accidents and maintain their sharpness. Consider hanging tools on a pegboard or storing them in a dedicated toolbox with compartments for each tool. This not only keeps your tools organized but also protects their sharp edges.
Making the Most of Sharp Tools
Once your tools are sharp, take full advantage of their effectiveness. Enjoy the clean cuts when pruning, the precision when weeding, and the ease of digging with sharp shovels. Let your sharp tools elevate your gardening experience.
Quote:
“Sharp garden tools are not just instruments for gardening but companions that make the work a joy.” – Unknown
Frequently Asked Questions
Q: How often should I sharpen my garden tools?
A: The frequency of sharpening depends on how frequently you use the tools and the type of tasks they are used for. As a general guideline, tools like pruners and shears may need sharpening every few months, while shovels and hoes may require less frequent sharpening.
Q: Can I sharpen garden tools myself?
A: Yes, you can sharpen garden tools yourself with the right tools and knowledge. There are various sharpening kits and tools available for DIY sharpening. However, if you’re unsure, it’s always a good idea to seek professional help.