Introduction
Welome to our comprehensive guide on how to grow orchids indoors. Whether you are a seasoned orchid enthusiast or just starting, this guide will provide you with valuable insights, tips, and techniques to help you cultivate beautiful orchids in your indoor space.
Why Choose Orchids?
Orchids are not just exquisite flowers; they are a symbol of beauty, luxury, and elegance. With their stunning array of colors and shapes, orchids can add a touch of sophistication to any indoor environment. Their exotic allure and delicate blooms make them a favorite among plant enthusiasts.
The Art of Indoor Orchid Cultivation
Cultivating orchids indoors can be a rewarding yet challenging endeavor. Unlike traditional houseplants, orchids have unique care requirements that need to be carefully tended to. Understanding the specific needs of orchids is crucial for their successful growth and blooming.
What This Guide Covers
This guide is designed to equip you with the knowledge and skills necessary to cultivate thriving orchids within the confines of your home. From selecting the right orchid species to providing the ideal growing conditions, we will walk you through each step of the process.
Get ready to embark on a journey into the enchanting world of orchids and unlock the secrets to nurturing these captivating flowers in your indoor oasis.
Brief Overview of the Popularity of Orchids and the Benefits of Growing Them Indoors
Orchids have captured the hearts of many indoor gardeners worldwide, not only for their stunning beauty but also for the numerous benefits they bring to indoor environments. Let’s delve into the reasons behind the popularity of orchids and why growing them indoors is a rewarding experience.
Popularity of Orchids
- Exotic Appeal: Orchids are known for their exotic and diverse appearances, making them highly desirable among plant enthusiasts seeking unique blooms.
- Elegant Aesthetics: The graceful and elegant look of orchids adds a touch of sophistication to any indoor space, enhancing the overall ambiance.
- Variety of Species: With over 25,000 documented species, orchids offer a wide range of choices, allowing growers to explore different colors, shapes, and sizes.
Benefits of Growing Orchids Indoors
- Air Purification: Orchids act as natural air purifiers, absorbing carbon dioxide and releasing oxygen, contributing to a healthier indoor atmosphere.
- Stress Reduction: Taking care of orchids can be a soothing and therapeutic activity, promoting relaxation and reducing stress levels.
- Indoor Decor Enhancement: Orchids serve as elegant decor elements, brightening up living spaces and adding a touch of natural beauty.
- Learning and Growth: Growing orchids indoors offers a continuous learning experience, allowing enthusiasts to expand their gardening skills and knowledge.
Types of Orchids for Indoor Growth
1. Phalaenopsis Orchids
Phalaenopsis orchids, also known as “moth orchids,” are popular for indoor cultivation due to their elegant and long-lasting flowers.
2. Dendrobium Orchids
Dendrobium orchids come in a variety of colors and sizes, making them a versatile choice for indoor orchid enthusiasts.
3. Cattleya Orchids
Cattleya orchids are admired for their vibrant and showy blooms, adding a touch of elegance to any indoor space.
4. Oncidium Orchids
Oncidium orchids, often called “dancing lady orchids,” feature cascades of tiny flowers and are well-suited for indoor environments.
Phalaenopsis Orchids
Phalaenopsis orchids, commonly known as moth orchids, are one of the most popular orchid varieties for indoor growing. Their delicate beauty and relatively easy care make them a favorite among orchid enthusiasts.
Light Requirements
Phalaenopsis orchids thrive in bright, indirect light. Placing them near a window where they can receive filtered sunlight is ideal. Avoid placing them in direct sunlight as this can scorch their leaves.
Watering
When it comes to watering Phalaenopsis orchids, it’s essential to strike a balance. Overwatering can lead to root rot, while underwatering can cause dehydration. Allow the top inch of the potting medium to dry out before watering again.
Humidity
These orchids prefer moderate to high humidity levels. You can increase humidity by placing a tray of water near the orchids or using a humidifier. Misting the leaves can also help maintain a humid environment.
Temperature
Phalaenopsis orchids thrive in temperatures between 60-85°F (15-29°C) during the day and slightly cooler at night. Avoid exposing them to extreme temperature fluctuations.
Potting and Repotting
Use a well-draining orchid potting mix when repotting Phalaenopsis orchids. Repot them every 1-2 years or when the potting medium breaks down. Repotting after the orchid has finished blooming is recommended.
Fertilizing
Feed your Phalaenopsis orchid with a balanced orchid fertilizer at half-strength every 2-4 weeks during the growing season. Avoid fertilizing during the dormant period.
Common Issues
- Yellowing Leaves: May indicate overwatering or too much direct sunlight.
- Bud Blast: Sudden bud drop can be caused by drafts or extreme temperature changes.
- Root Rot: Caused by overwatering, leading to mushy, brown roots.
Quote
Phalaenopsis orchids reward patience and care with stunning blooms that can last for months.
Cattleya Orchids
Cattleya orchids, known for their vibrant and showy blooms, are popular among indoor gardeners. These stunning orchids require specific care to thrive indoors, bringing charm and elegance to any space. Let’s delve into the essential tips for growing Cattleya orchids indoors.
Light Requirements
Cattleya orchids thrive in bright, indirect light. Place them near a south or east-facing window where they can receive ample sunlight without being exposed to direct rays that may scorch their leaves.
Temperature and Humidity
Maintain a daytime temperature of 70-85°F (21-29°C) and a nighttime temperature that is slightly cooler. Adequate humidity levels of around 40-60% are crucial for the health of Cattleya orchids.
Watering and Fertilizing
- Water Cattleya orchids thoroughly when the potting medium is dry to the touch, typically every 5-7 days. Ensure good drainage to prevent waterlogging.
- During the growing season, fertilize with a balanced orchid fertilizer at half-strength every other watering to promote healthy growth and vibrant blooms.
Potting and Repotting
“Repot Cattleya orchids every 2-3 years to refresh the potting medium and provide ample space for new growth.”
Air Circulation and Maintenance
Proper air circulation is essential for Cattleya orchids to prevent fungal diseases. Avoid overcrowding plants and ensure good air movement around the orchids.
Pest and Disease Control
- Regularly inspect your Cattleya orchids for common pests like aphids and spider mites.
- Address any signs of yellowing leaves or spots promptly to prevent the spread of diseases.
Final Notes
- Growing Cattleya orchids indoors can be a rewarding experience with the right care and attention.
- Observing your orchids closely will help you understand their individual needs and ensure they flourish in your indoor garden.
Dendrobium Orchids
Dendrobium orchids are a diverse group of orchids known for their unique appearance and stunning blooms. Here, we delve into the world of Dendrobium orchids, exploring their care requirements and highlighting key tips for successfully growing these beauties indoors.
Diverse Varieties
Dendrobium orchids encompass a vast array of species and hybrids, ranging from the miniature to the majestic. With a variety of colors, shapes, and sizes, there is a Dendrobium orchid to suit every orchid enthusiast’s taste.
Light Requirements
Light: Dendrobium orchids thrive in bright, indirect light. Providing them with ample light ensures healthy growth and vibrant blooms. Avoid exposing them to direct sunlight for extended periods, as this can scorch the delicate foliage.
Temperature and Humidity
Temperature: Dendrobium orchids prefer daytime temperatures between 70-80°F (21-27°C) and slightly cooler temperatures at night. Maintaining this temperature range mimics their natural habitat and promotes optimal growth.
Humidity: These orchids thrive in moderate to high humidity levels, ideally around 60-70%. Using a humidifier or placing a tray of water near the plants can help create a conducive environment.
Watering and Feeding
Watering: Allow the orchid’s roots to dry out slightly between waterings to prevent overwatering, which can lead to root rot. Water them thoroughly when the top inch of the potting medium feels dry.
Feeding: During the growing season, fertilize Dendrobium orchids regularly with a balanced orchid fertilizer to support healthy growth and vibrant blooms. Reduce feeding during the dormant period to allow the plant to rest.
Potting and Repotting
Potting: Use a well-draining orchid mix to pot Dendrobium orchids, allowing for adequate aeration and moisture retention. Repot the orchids every 2-3 years or when the potting medium breaks down to ensure continued growth.
Pruning and Maintenance
Pruning: Trim dead or yellowing foliage and spent flower spikes to encourage new growth and blooming. Regularly inspect the plants for pests and diseases, addressing any issues promptly to maintain their health.
Final Thoughts
By providing the right growing conditions and care, Dendrobium orchids can reward growers with an exquisite display of blooms and lush foliage. Embrace the beauty and elegance of these captivating orchids as you embark on your indoor orchid-growing journey.
Oncidium Orchids
Oncidium orchids are a delightful addition to any indoor orchid collection, known for their intricate and colorful blooms. Let’s delve deeper into the world of caring for these beautiful orchids.
Light Requirements
Oncidium orchids thrive in bright, indirect light. Place them near a south or west-facing window where they can receive filtered sunlight throughout the day. Avoid direct sunlight as it can scorch their delicate leaves.
Temperature and Humidity
These orchids prefer temperatures between 60-80°F during the day and slightly cooler at night. Maintaining a humidity level of around 50-70% is ideal for their well-being. Consider using a humidifier or placing a tray of water near the orchids to increase humidity.
Watering and Feeding
Water your Oncidium orchids when the top inch of the potting mix feels dry to the touch. Use room temperature water and allow excess water to drain out to prevent root rot. Fertilize them with a balanced orchid fertilizer every 2-4 weeks during the growing season.
Potting and Repotting
Repot Oncidium orchids every 1-2 years using a well-draining orchid mix. Look for signs such as roots growing over the pot’s edge or the mix breaking down as indicators that it’s time to repot. Be gentle with their sensitive root system during the repotting process.
Common Pests and Diseases
Keep an eye out for common orchid pests like spider mites and aphids. Treat infestations promptly with insecticidal soap or horticultural oil. Additionally, watch for signs of root rot caused by overwatering, and adjust your watering practices accordingly.
By following these care tips, you can enjoy the exquisite blooms of Oncidium orchids in your indoor space, bringing a touch of elegance and beauty to your surroundings.
Vanda Orchids
Vanda orchids are stunning flowering plants that are known for their vibrant colors and unique appearance. Here, we provide essential tips and guidelines for successfully growing Vanda orchids indoors.
Light Requirements
Vanda orchids require strong, bright light to thrive. Place them near a window where they can receive indirect sunlight or under a grow light for about 10-14 hours a day.
Temperature and Humidity
Maintain a warm temperature between 70-85°F (21-29°C) during the day and a slightly cooler temperature at night. Humidity levels should be around 60-70%; consider using a humidifier or pebble tray to increase humidity.
Watering and Feeding
Water your Vanda orchids early in the day to allow foliage to dry before evening. Use a balanced orchid fertilizer and feed them every 2-3 weeks during the growing season.
Potting and Medium
Plant Vanda orchids in well-draining media such as coarse bark or sphagnum moss. Avoid overpotting to prevent waterlogged roots; repot only when necessary.
Air Circulation
Good air circulation is crucial for Vanda orchids to prevent fungal diseases and promote healthy growth. Use a fan to ensure airflow around the plants.
Common Issues
- Yellowing leaves: Could indicate overwatering or inadequate light.
- Root rot: Caused by waterlogged conditions; adjust watering accordingly.
- Pest infestations: Keep an eye out for pests like scale or spider mites; treat promptly if detected.
Setting Up the Ideal Environment
The Right Location
Find a spot in your home that receives bright, indirect sunlight throughout the day. East or west-facing windows are ideal.
Temperature and Humidity
Maintain a consistent temperature between 65-75°F during the day and a slightly cooler temperature at night. Orchids thrive in humid environments, so consider using a humidifier or a humidity tray.
Air Circulation
Ensure good airflow around your orchids to prevent stagnant air. A gentle breeze from a fan or opening windows periodically can help.
Choosing the Right Pot
Select orchid pots with good drainage holes to avoid waterlogging. Orchids prefer to have their roots slightly crowded, so choose a pot that fits the current root size with room for 1-2 years of growth.
Substrate Selection
Use a well-draining orchid mix that provides good aeration for the roots. You can also add materials like bark, sphagnum moss, or perlite to enhance drainage.
Watering Schedule
Establish a regular watering routine based on your orchid’s specific needs. It’s crucial to water thoroughly but allow the roots to dry out slightly between waterings to prevent root rot.
Fertilization
Feed your orchids with a balanced orchid fertilizer at half-strength every 2-4 weeks during the growing season. Reduce feeding during the dormant winter months.
Light Requirements
Proper light exposure is essential for the growth and blooming of your indoor orchids. Understanding the light requirements of your orchids will help you provide them with the optimal conditions for thriving.
1. Placement
Identify the best location in your home that offers suitable lighting conditions for your orchids. Consider placing them near east or west-facing windows to provide them with indirect sunlight.
2. Intensity
Orchids require moderate to bright light levels for healthy growth. Monitor the intensity of light your orchids receive to ensure they are not exposed to direct sunlight, which can cause sunburn.
3. Duration
Most orchids thrive with around 10-12 hours of light per day. Adjust the duration of light exposure based on the specific light requirements of the orchid species you are growing.
4. Supplemental Lighting
If natural light is limited in your home, consider using grow lights to supplement the light requirements of your orchids. LED grow lights are a popular choice for providing adequate light for indoor orchids.
5. Light Quality
Ensure that the light source for your orchids emits a balanced spectrum of light, including both cool and warm tones. This mimics natural sunlight and supports optimal growth and flowering.
6. Light Distance
Adjust the distance between the light source and your orchids to prevent them from getting scorched or deprived of light. Maintain an appropriate distance to ensure your orchids receive the right amount of light without harm.
Temperature and Humidity Levels
Achieving the right temperature and humidity levels is crucial for the successful growth of orchids indoors. These delicate plants require specific conditions to thrive and bloom abundantly.
Temperature Requirements
- Daytime: Maintain temperatures between 70-80°F (21-27°C) during the daytime for most orchid varieties.
- Nighttime: Orchids generally prefer a slightly cooler nighttime temperature, around 60-70°F (15-21°C).
- Temperature Fluctuations: Moderate fluctuations of around 10-15 degrees between day and night are beneficial for orchids.
Humidity Levels
Orchids are accustomed to humid environments, akin to their tropical origins. Proper humidity levels are essential for their growth and health.
- Ideal Humidity: Aim for 60-80% humidity in the orchid’s surroundings.
- Humidity Sources: Use a humidifier, a humidity tray filled with water and pebbles, or regularly mist the orchid’s leaves to maintain adequate moisture.
- Air Circulation: Ensure good air circulation to prevent stagnant, overly humid conditions that may lead to mold or rot.
Monitoring and Adjusting
Regularly monitor the temperature and humidity levels in the orchid’s environment to ensure they remain within the optimal range. Adjust as needed to provide the best conditions for your orchids.
Potting Mix and Containers
Choosing the Right Potting Mix
When it comes to growing orchids indoors, the choice of potting mix is crucial for their health and growth. Consider the following:
- Well-Draining: Orchids require excellent drainage to prevent root rot. Look for mixes specifically designed for orchids, typically including materials like bark, perlite, and sphagnum moss.
- Aerated: Good aeration is essential for orchid roots. A mix that allows air to circulate freely around the roots will promote healthy growth.
- Hydrating: While orchids don’t like to sit in water, they do need sufficient moisture. Choose a mix that retains some water while still allowing excess to drain away.
Container Considerations
The type of container you choose can also impact the well-being of your orchids. Keep these points in mind:
- Proper Drainage: Select pots with drainage holes to prevent water from accumulating at the bottom, which can lead to root suffocation.
- Adequate Size: Orchids prefer snug containers that just fit their roots. A pot too large can lead to overwatering, while one too small may constrict growth.
- Transparent or Opaque: Transparent pots allow light to reach orchid roots, aiding photosynthesis. Opaque pots, on the other hand, protect roots from light, which some orchid varieties prefer.
Repotting
As orchids grow, they may need repotting to provide fresh nutrients and space for their roots to expand. Look for signs such as roots growing over the pot’s edges or poor drainage, indicating the need for repotting.
Quotable
“The right potting mix and container can make all the difference in ensuring your orchids thrive indoors.”
Watering and Feeding
Proper Watering Techniques
One of the most critical aspects of orchid care is ensuring that they receive the right amount of water. Overwatering can lead to root rot, while underwatering can cause the orchid to wither and die. Here are some essential tips for watering your orchids:
- Check the roots: Before watering, make sure to check the moisture level of the roots. Stick your finger into the growing medium; if it feels dry an inch below the surface, it’s time to water.
- Water thoroughly: When watering, ensure that the water drains freely through the pot. This helps prevent waterlogged conditions that can harm the roots.
- Use room-temperature water: Avoid using cold water, as orchids prefer water at room temperature. Water in the morning so that any excess moisture evaporates during the day.
- Consider the season: Orchids may need more frequent watering during their active growth phase and less during their dormant period.
Fertilizing Your Orchids
“Feeding your orchids is like providing them with a gourmet meal.”
Orchids require regular feeding to thrive and bloom beautifully. Here are some key points to remember when fertilizing your orchids:
- Choose the right fertilizer: Use a balanced orchid fertilizer with equal amounts of nitrogen, phosphorus, and potassium. You can also opt for a specialized orchid fertilizer formulated for different growth stages.
- Follow a feeding schedule: During the active growing season, feed your orchids every two weeks. Reduce feeding frequency during the dormant period.
- Apply fertilizers properly: Dilute the fertilizer to half or quarter strength to avoid damaging the roots. Make sure to water your orchids before and after fertilizing to prevent root burn.
- Observe your orchids: Watch for signs of over-fertilization, such as salt buildup on the growing medium. Adjust your feeding regimen accordingly to maintain healthy orchids.
Proper Watering Techniques
Proper watering is essential for the health and vitality of your indoor orchids. By understanding the right techniques, you can ensure that your plants thrive and bloom beautifully.
The Importance of Watering
Watering is a critical aspect of orchid care, as these plants have specific needs different from typical houseplants. Understanding these needs will help you provide the best environment for your orchids to flourish.
Watering Frequency
It’s crucial to avoid overwatering your orchids, as this can lead to root rot and other issues. Watering frequency will depend on factors like the type of orchid, the potting medium used, and the environmental conditions.
Testing Moisture Levels
Before watering your orchid, check the moisture level of the potting medium. Stick your finger into the medium about an inch deep; if it feels dry, it’s time to water. If it’s still moist, hold off on watering to prevent over-saturation.

Watering Methods
When watering your orchids, ensure thorough hydration by allowing water to drain freely from the pot. Use room-temperature water to avoid shocking the roots. Orchids should never sit in standing water as this can cause root suffocation.
Consider the Environment
Take into account the humidity levels in your home when determining your orchid’s watering needs. Orchids in high humidity environments might require less frequent watering, while those in drier conditions may need more regular watering.
Fertilizing Schedules
Proper fertilization is crucial for the healthy growth of your indoor orchids. Creating a well-thought-out fertilizing schedule will ensure that your plants receive the necessary nutrients to thrive and bloom abundantly.
Frequency of Fertilization
Orchids require regular feeding during their active growing season. Typically, feeding every two weeks is recommended for most orchid varieties. However, it’s essential to adjust this schedule based on the specific needs of your orchid species and the type of fertilizer you are using.
Types of Fertilizers
When choosing a fertilizer for your orchids, opt for a balanced formulation specifically designed for orchids. Look for a fertilizer high in nitrogen (N) for growth, moderate in phosphorus (P) for bloom development, and moderate in potassium (K) for overall plant health.
Application Methods
There are various methods to apply fertilizer to your orchids:
- Top-Dressing: Sprinkle fertilizer on top of the growing medium during regular watering.
- Watering: Dilute the fertilizer in water according to package instructions and water your plants with the solution.
- Foliar Feeding: Spray a diluted fertilizer solution directly on the leaves of your orchids.
Monitoring and Adjusting
Regularly monitor the growth and health of your orchids to determine if any adjustments to the fertilizing schedule are needed. Signs of over-fertilization include burnt roots, deformed leaves, or lack of blooming, while signs of under-fertilization include slow growth and weak foliage.
Quote
“Fertilizing orchids is an art that requires patience and observation. Adjusting your fertilizing schedule based on the specific needs of your plants will lead to beautiful and healthy blooms.”
Orchid Care and Maintenance
Light and Temperature
One of the crucial factors in growing orchids indoors is providing them with the right amount of light and temperature. Orchids generally thrive in bright, indirect light. Ensure they receive around 12-14 hours of light each day but avoid direct sunlight as it can scorch their delicate leaves.
Watering and Humidity
Proper watering is essential for orchids. They prefer a humid environment, so misting their leaves can help simulate their natural habitat. It’s important to let the roots dry slightly between waterings to prevent root rot.
Potting and Repotting
Choose a well-draining potting mix specifically formulated for orchids. Repot your orchids every 1-2 years when you notice their roots outgrowing the current pot. Be gentle to avoid damaging the delicate root system.
Fertilizing
Apply a balanced orchid fertilizer at half strength every 2-4 weeks during the growing season. Avoid fertilizing during the dormant period as orchids require less nutrients during this time.
Air Circulation
Good air circulation is important for orchids as it helps prevent fungal and bacterial diseases. Use a small fan to ensure there is adequate air movement around your orchids, especially in humid climates.
Monitoring and Pests
Regularly inspect your orchids for any signs of pests or diseases such as yellowing leaves, spots, or unusual growths. Treat any issues promptly to prevent them from spreading and affecting the health of your orchids.
Pruning and Removing Spent Blooms
Proper pruning and removing spent blooms are essential practices to maintain the health and beauty of your indoor orchids. Follow these guidelines to ensure your orchids thrive:
Regular Pruning Techniques
- Trimming Dead Roots: Regularly inspect the roots of your orchid and trim any dead or decaying roots to prevent the spread of disease.
- Cutting Back Flower Spikes: After your orchid has finished blooming, trim the flower spike at the base to encourage new growth.
- Removing Yellowing Leaves: Trim yellowing or damaged leaves to promote the overall health of the plant.
Removing Spent Blooms
When the blooms on your orchid begin to fade, it is important to remove them properly to redirect the plant’s energy. Follow these steps:
- Gently twist or cut: Gently twist the stem of the spent bloom until it detaches from the plant, or use sterilized pruning shears to cut it off.
- Cut at an angle: When using pruning shears, make a clean cut at a 45-degree angle to prevent water accumulation and potential rot.
- Monitor for pests: Inspect the blooms and the plant for any signs of pests, especially if there are visible damages.
Quotes on Pruning
“Pruning is not just about cutting away the old; it’s about making room for the new growth that follows.”
By practicing regular pruning and removing spent blooms, you can ensure that your indoor orchids continue to flourish and grace your space with their exquisite beauty.
Repotting Guidelines
Repotting your orchids is a crucial task that requires care and attention to ensure the health and vitality of your plants. Here are some guidelines to help you successfully repot your orchids:
Choosing the Right Time
- Repot orchids when they are not in bloom or when new growth is just starting.
- Avoid repotting during the flowering period as it may stress the plant.
Preparing the Orchid
Before repotting, gently remove the orchid from its current pot and carefully inspect the roots for any signs of rot or disease. Trim any dead or rotting roots with sterilized tools to promote healthy growth.
Selecting the Pot and Medium
Choose a pot that allows for proper drainage and has enough room for the roots to grow. Use a well-draining orchid mix or create a mix using materials like bark, sphagnum moss, and perlite to provide aeration and moisture retention.
Repotting Process
- Place a layer of drainage material at the bottom of the new pot.
- Position the orchid in the center of the pot and add the potting mix around the roots, ensuring they are stable but not packed tightly.
- Water the orchid lightly after repotting to help settle the mix around the roots.
Aftercare
After repotting, place the orchid in a location with appropriate light levels and humidity. Avoid fertilizing the orchid immediately after repotting to prevent root burn. Monitor the plant closely for the first few weeks to ensure it adapts well to its new environment.
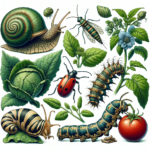
Dealing with Common Pests and Diseases
Pest Control
Prevention: Regularly inspect your orchids for any signs of pests such as aphids, mealybugs, or spider mites. Quarantine new plants before introducing them to your collection.
Natural Remedies: Use natural predators like ladybugs or neem oil to control small infestations. Neem oil is effective against a variety of pests and is safe for most orchid varieties.
Mechanical Removal: For larger pests like snails or slugs, handpick them off your plants and dispose of them carefully.
Disease Management
Cultural Conditions: Ensure proper air circulation and avoid overwatering to prevent common diseases such as root rot and fungal infections.
Sanitation: Regularly remove dead or decaying plant material from around your orchids to reduce the risk of fungal diseases.
Treatment: If you notice signs of disease such as yellowing leaves or mold, isolate the affected plant immediately to prevent it from spreading to others. Treat with a suitable fungicide or bactericide.
Integrated Pest Management (IPM)
Implementing an IPM approach involves combining prevention, monitoring, and control methods to minimize the impact of pests and diseases on your orchids.
- Monitor: Regularly check your plants for any abnormalities or signs of pests/diseases.
- Identify: Properly identify the pest or disease to choose the most effective control methods.
- Control: Use a combination of cultural, biological, and chemical control methods as needed, prioritizing non-toxic options whenever possible.
Remember:
“Vigilance is key in maintaining the health and beauty of your orchid collection. By staying observant and proactive, you can minimize the impact of pests and diseases.”
Orchid Display and Styling Tips
Creating a Captivating Orchid Display
When it comes to showcasing your orchids, a thoughtful and artistic display can enhance the beauty of these exquisite plants. Consider these tips for creating a captivating orchid display:
- Grouping: Cluster orchids together to create a striking focal point that showcases their diversity.
- Height Variation: Use stands or shelves to create layers and add visual interest to the display.
- Contrast: Pair orchids with dark or light backgrounds to make their colors pop.
Styling Tips for Orchid Arrangements
Arranging orchids in a stylish and harmonious way can elevate the overall look of your space. Consider these tips for styling your orchid arrangements:
- Balance: Create a sense of equilibrium by distributing orchids evenly throughout the space.
- Color Harmony: Combine orchids with complementary colors to create a cohesive and visually appealing arrangement.
- Container Selection: Choose containers that complement the style of your orchids and fit the overall aesthetic of the space.
Enhancing Your Orchid Display with Accessories
Adding accessories to your orchid display can enhance its charm and elegance. Here are some accessories to consider incorporating:Decorative Stones: Place decorative stones around the base of your orchids to add a touch of natural beauty. Miniature Figurines: Introduce whimsy to your display by including miniature figurines like fairies or animals among the orchids. Artificial Moss: Enhance the overall look of your display by adding artificial moss to create a lush and enchanting setting.
Maintaining the Elegance of Your Orchid Display
To ensure that your orchid display maintains its elegance and allure, it is essential to pay attention to its upkeep and maintenance:
- Regular Watering: Follow a consistent watering schedule to keep your orchids hydrated and thriving.
- Monitor Light Levels: Place your orchids in locations with appropriate light levels to promote healthy growth.
- Pruning and Grooming: Trim dead stems and leaves to keep your orchids looking tidy and vibrant.
Creative Ways to Showcase Orchids in Your Home Decor
Orchids are not just exquisite flowers; they can also be stunning additions to your home decor. Here are some creative ways to showcase these beautiful plants in your living space:
1. Orchid Centerpieces
Create elegant centerpieces using orchids in unique vases or containers. Place them on dining tables or coffee tables to add a touch of sophistication to the room. Mix and match different orchid colors for a vibrant display.
2. Hanging Orchid Gardens
Hang orchids in glass terrariums or decorative baskets to create hanging gardens indoors. This not only saves space but also adds a whimsical element to your decor. Ensure they receive adequate light and moisture for healthy growth.
3. Orchid Wall Art
Frame pressed orchids or orchid prints to create botanical wall art pieces. Arrange them in a gallery wall or as standalone pieces to bring nature indoors. These art pieces can be both visually appealing and conversation starters.
4. Orchid Terrariums
Build mini orchid terrariums using glass containers or jars. Layer the bottom with stones or pebbles for drainage, add orchids, and top it with moss for a lush look. These terrariums add a touch of greenery to shelves, windowsills, or desks.
5. Orchid Accents
Use orchids as accent pieces in various rooms. Place a single orchid bloom in a bud vase on bedside tables, bathroom counters, or study desks. The simplicity of a solitary orchid can make a bold statement in any space.
Integrating orchids into your home decor can elevate the ambiance and bring a sense of tranquility. Experiment with different arrangements and styles to find the perfect showcase for these graceful flowers.
Orchid Arrangement Ideas
Creating stunning orchid arrangements can bring a touch of elegance and beauty to any indoor space. Here are some creative ideas to inspire your next orchid display:
1. Single Orchid Focus
For a minimalist yet sophisticated look, consider showcasing a single orchid as the focal point of your arrangement. Place it in a decorative pot or vase to enhance its beauty.
2. Orchid Pairing
Pairing different types of orchids with complementary colors and shapes can create a visually appealing arrangement. Experiment with placing orchids of varying heights together for added dimension.
3. Orchid Terrarium
Transform a glass terrarium into a mini orchid garden by adding small orchid plants, moss, and decorative stones. This enclosed environment can create a unique and captivating display.
4. Hanging Orchids
Suspend orchids in hanging planters or baskets to add a touch of whimsy to your indoor space. This vertical arrangement not only saves space but also adds a dynamic element to your decor.
5. Orchid Centerpiece
Create a stunning orchid centerpiece for your dining or coffee table. Combine orchids with candles, greenery, or other ornamental elements to craft a captivating focal point for your room.
Experiment with these orchid arrangement ideas to bring a sense of charm and sophistication to your indoor environment.
Frequently Asked Questions (FAQs)
General Questions
- Q: How often should I water my indoor orchids?
- A: Orchids should be watered about once a week. Make sure the water drains properly to prevent root rot.
- Q: What is the ideal temperature for indoor orchids?
- A: Indoor orchids thrive in temperatures between 65-75 degrees Fahrenheit during the day and slightly cooler at night.
- Q: Should I fertilize my orchids, and if so, how often?
- A: Use a balanced orchid fertilizer once a month during the growing season. Reduce frequency during the dormant period.
Potting and Repotting
- Q: How do I know when it’s time to repot my orchid?
- A: Repot your orchid when you see roots growing over the pot’s edge or when the potting medium breaks down.
- Q: What type of potting mix is best for orchids?
- A: Use a well-draining orchid mix with materials like bark, sphagnum moss, or perlite to promote healthy root growth.
Lighting and Placement
- Q: How much light do indoor orchids need?
- A: Orchids generally require bright, indirect light. Avoid direct sunlight, which can burn their leaves.
- Q: Can I place my orchid near a window?
- A: Yes, but ensure it receives filtered sunlight or use sheer curtains to prevent the leaves from scorching.
Address Common Queries and Provide Helpful Solutions
1. Choosing the Right Orchid for Indoors
When selecting orchids for indoor cultivation, consider Phalaenopsis, Cattleya, or Oncidium as they perform well in indoor conditions.
2. Light and Temperature Requirements
Ensure your orchids receive indirect sunlight and maintain temperatures between 65-75°F during the day and around 55°F at night for optimal growth.
3. Watering Techniques
Water your orchids once a week or when the top inch of the potting medium feels dry. Use rainwater or distilled water to prevent mineral buildup.
4. Humidity and Air Circulation
Maintain 50-70% humidity levels around your orchids. A small fan can help enhance air circulation, preventing fungal issues.
5. Fertilizing Tips
Fertilize your orchids with a balanced orchid fertilizer at half strength bi-weekly during the growing season.
6. Repotting Guidance
Repot your orchids every 1-2 years using fresh orchid mix to provide proper drainage and aeration.
7. Common Pests and Diseases
Keep an eye out for pests like aphids, mealybugs, and spider mites. Treat infestations promptly with neem oil or insecticidal soap.
8. Troubleshooting Flowering Issues
If your orchid fails to bloom, check for inadequate light, improper temperature, or overfertilization as potential culprits for flowering problems.
Conclusion
In the captivating journey of growing orchids indoors, patience and diligence play vital roles. By understanding the unique needs of each orchid variety and providing a nurturing environment, you can witness the beauty of these exquisite flowers blossoming in your own home. Remember, every effort you put into caring for your orchids is rewarded with their graceful presence and fragrant allure.
Continual Learning
Learning about orchids is an ongoing process that enriches your experience as a grower. Stay inquisitive and open-minded to new techniques and discoveries in orchid care. Each orchid has its story to tell, and by immersing yourself in this world, you gain a deeper appreciation for the intricacies of these remarkable plants.
Community Connection
Connecting with fellow orchid enthusiasts can be a source of inspiration and support on your orchid-growing journey. Share your experiences, seek advice, and celebrate successes together. The orchid community is a place where passion for these flowers unites individuals from diverse backgrounds in a shared appreciation for nature’s wonders.
Celebrating Orchid Diversity
Each orchid variety brings its own unique charm and challenges to the grower. Embrace this diversity and beauty, reveling in the array of colors, shapes, and fragrances that orchids offer. By cultivating different types of orchids, you create a tapestry of floral wonders that enrich your indoor space.
The world of orchids invites you to delve deeper into the marvels of nature, nurturing not just plants but a sense of wonder and gratitude for the botanical splendors that grace our lives.
Recap of Key Points and Encouragement for Successfully Growing Orchids Indoors
As we conclude our journey on successfully growing orchids indoors, let’s recap some key points and provide encouragement to help you nurture these delicate beauties with confidence.
Key Points Recap:
- Proper Light: Ensure your orchids receive adequate but indirect sunlight to thrive.
- Correct Watering: Water sparingly and allow for proper drainage to prevent root rot.
- Optimal Humidity: Maintain a humid environment around your orchids, especially in dry climates.
- Appropriate Temperature: Keep your orchids in a space with consistent and moderate temperatures to promote growth.
- Proper Air Circulation: Ensure good air flow around your orchids to prevent issues like mold or pests.
Encouragement for Your Orchid Journey:
Remember that patience and observation are key when caring for orchids. The process of growth and blooming may take time, but your efforts will be rewarded with the exquisite beauty of these plants.
Do not be disheartened by setbacks or challenges along the way. Learning and adapting to your orchid’s needs is all part of the rewarding experience of indoor orchid cultivation.
“Like a delicate symphony, the growth of an orchid requires skill, patience, and a deep appreciation for the harmonies of nature.”
Embrace this journey with a sense of wonder and joy, and may your orchids flourish under your attentive care.