Benefits of Planting Seeds Indoors
Indoor seed starting offers numerous advantages for both novice and experienced gardeners. From greater control over growing conditions to extended growing seasons, here are the benefits of planting seeds indoors:
1. Controlled Environment
Indoor seed starting allows you to create a controlled environment that is not subject to unpredictable weather conditions. You can regulate temperature, humidity, and light levels to ensure optimal germination and growth.
2. Early Start
By planting seeds indoors, you can get a head start on the growing season. This early start can lead to earlier harvests and a longer period to enjoy your plants’ yields.
3. Variety of Plants
Planting seeds indoors provides you with a vast array of plant options. From vegetables to flowers, you can choose from a wide variety of seeds to grow in your indoor garden.
4. Cost-Effective
Starting seeds indoors is a cost-effective way to garden. Seeds are generally less expensive than purchasing seedlings or mature plants, allowing you to grow a greater quantity of plants for a fraction of the cost.
5. Personal Satisfaction
Watching seeds sprout and grow into healthy plants can be incredibly fulfilling. The sense of accomplishment and connection with nature that comes from nurturing plants from seed to maturity is rewarding.
Embark on your indoor gardening journey and reap the benefits of planting seeds indoors!
Provides an early start for growing season
When it comes to planting seeds indoors, starting early can give you a head start on the growing season. By initiating the growth of your plants indoors, you can control the environment and ensure optimal conditions for germination and early growth.
Benefits of Starting Early
- Extended Growing Season: By planting seeds indoors, you can start the growing process before the last frost date, giving your plants a longer time to mature and produce.
- Controlled Environment: Indoor seed starting allows you to regulate temperature, moisture, and light, providing ideal conditions for seed germination.
- Healthier Seedlings: Starting seeds indoors helps avoid common outdoor threats like pests and harsh weather, leading to stronger and healthier seedlings.
Tips for Successful Seed Starting
- Choose the Right Seeds: Select seeds that are suitable for indoor starting and consider the recommended timing for each type of plant.
- Use Quality Seed Starting Mix: Opt for a well-draining, sterile seed starting mix to provide a healthy environment for germination.
- Provide Adequate Light: Ensure your seedlings receive sufficient light by placing them near a bright window or using artificial grow lights.
- Monitor Moisture Levels: Keep the soil consistently moist but not waterlogged to support seed germination without causing rot.
- Acclimate Seedlings: Before transplanting outdoors, gradually expose your seedlings to outdoor conditions to prevent shock.
Starting your seeds indoors can be a rewarding and effective way to kickstart your garden. With the right approach and care, you can nurture strong seedlings that will flourish once transplanted into your outdoor garden.
Allows Better Control Over Growing Conditions
Customized Environment
Indoor seed planting enables you to create a customized environment suited to the specific needs of each plant variety. You can adjust factors such as temperature, light exposure, humidity, and airflow to optimize growth.
Pest and Disease Management
With indoor seed planting, you have better control over pest and disease management. By keeping your plants indoors, you can reduce the likelihood of pests infesting your crops and take proactive measures against diseases.
Consistent Growing Conditions
Indoor planting allows for consistent growing conditions throughout the year. You can maintain a stable environment regardless of external weather variations, ensuring steady growth for your plants.
Optimized Nutrient Intake
By planting seeds indoors, you can control the nutrient intake of your plants more effectively. This control allows you to provide optimal nutrition for each growth stage without relying on external factors.
Ideal for starting plants that require a longer growing season
Indoor Seed Starting Benefits
Indoor seed starting is ideal for plants that require a longer growing season or when outdoor conditions are not favorable.
- Prolonged Growing Period: Allows plants to establish strong root systems before being transplanted outdoors.
- Protection from Harsh Weather: Shields delicate seedlings from unexpected frosts or extreme heat.
- Precision Environment: Control over light, temperature, and humidity for optimal growth.
Choosing the Right Seeds
When selecting seeds for indoor planting, consider:
- Seedling Duration: Choose plants that require a longer growing season to mature.
- Space Requirements: Opt for seeds that don’t need extensive space for root development.
- Growth Characteristics: Select plants that thrive in controlled indoor environments.
Key Steps for Success
- Seed Selection: Pick high-quality seeds suited for indoor germination.
- Seed Starting Mix: Use a sterile, well-draining soil mix for healthy seedling development.
- Lighting: Provide adequate light to mimic natural sunlight for robust growth.
- Watering: Keep the soil consistently moist but not waterlogged to prevent damping off.
Supplies Needed for Indoor Seed Planting
Essential Supplies:
- Seeds: Choose high-quality seeds of your preferred plants.
- Containers: Use containers with drainage holes to prevent waterlogging.
- Seed Starting Mix: Opt for a sterile, lightweight mix that promotes seedling growth.
- Grow Lights: Ensure adequate lighting for healthy seedling development.
- Watering Can: To provide gentle and controlled watering to the seeds.
Helpful Tools:
- Seedling Heat Mat: Aids in maintaining optimal soil temperature for germination.
- Humidity Dome: Creates a greenhouse-like environment for moisture retention.
- Plant Markers: Keep track of different seedlings for easy identification.
- Tray or Saucer: Place under containers to capture excess water and prevent mess.
Optional Accessories:
- Transplanting Tools: Useful for moving seedlings to larger pots as they grow.
- Organic Fertilizer: Supplement seedlings with nutrients for healthy development.
- Pruning Shears: Maintain plant health and shape as they mature.
Seeds of Your Choice
When it comes to selecting the seeds for your indoor planting journey, the choices can be vast and overwhelming. Here’s a professional guide to help you make informed decisions:
Understanding Seed Types
- Open-Pollinated Seeds: These seeds are reliable for producing plants that are true to the parent plant.
- Hybrid Seeds: Created by cross-pollinating two different varieties, these seeds may result in stronger plants or specific traits.
- Heirloom Seeds: These seeds have been passed down for generations and are cherished for their unique characteristics.
Factors to Consider
When selecting seeds for indoor planting, consider the following factors:
- Space: Choose seeds that match the available space in your indoor garden.
- Light Requirements: Some seeds require more sunlight than others. Ensure your indoor space can provide the necessary light.
- Timing: Select seeds that align with the current season for optimal growth.
Popular Seed Choices
Here are some popular seeds that thrive in indoor environments:
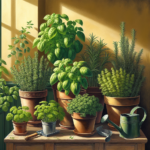
- Herbs: Basil, mint, and parsley are excellent choices for indoor herb gardens.
- Vegetables: Tomatoes, peppers, and lettuce can be successfully grown indoors with proper care.
- Flowers: Marigolds, pansies, and petunias add beauty to indoor spaces.
Remember, choosing the right seeds is the first step towards a successful indoor gardening experience.
Seed Starting Mix
Choosing the Right Seed Starting Mix
When it comes to planting seeds indoors, choosing the right seed starting mix is crucial for the successful germination and growth of your plants. Here are some key points to consider:
- Well-draining: Ensure the mix is well-draining to prevent waterlogging, which can lead to root rot.
- Lightweight: A lightweight mix promotes root development and allows for easy seedling transplanting.
- Moisture Retention: Look for a mix that retains moisture well to provide a consistent environment for seed germination.
Making Your Own Seed Starting Mix
For those who prefer a hands-on approach, making your own seed starting mix can be a rewarding process. Here is a simple recipe to create your own mix:
- Ingredients:
- 1 part peat moss
- 1 part perlite
- 1 part vermiculite
- Instructions:
Benefits of Using a Seed Starting Mix
Using a specialized seed starting mix offers several advantages over regular garden soil:
“A seed starting mix provides the ideal growing environment for young seedlings, promoting healthy root development and minimizing disease risks.”
Tips for Using Seed Starting Mix
Here are some helpful tips to ensure the best results when using a seed starting mix:
- Pre-moisten the mix: Before planting, make sure to moisten the mix to the right consistency for seed germination.
- Use clean containers: Always use clean, sterile containers to prevent the introduction of pathogens.
- Label your plantings: Remember to label your seeds to avoid confusion once they start growing.
Containers or Seed Trays
Choosing the Right Containers
When planting seeds indoors, selecting the appropriate containers is crucial for the success of your gardening venture. Consider the following:
- Material: Opt for containers made of breathable materials like plastic, peat pots, or trays with drainage holes to prevent waterlogging.
- Size: Ensure the containers are large enough to accommodate the seedlings as they grow, providing ample space for the roots to spread.
- Depth: Choose containers that are deep enough to allow for proper root development.
- Quantity: Depending on the number of seeds you intend to plant, have an adequate amount of containers ready.
Seed Trays
Seed trays are a convenient option for starting seeds indoors, offering a structured and organized approach to seed starting. Here are some benefits:
- Efficient Use of Space: Seed trays allow you to plant multiple seeds in a compact area, maximizing your indoor gardening space.
- Easy to Manage: These trays make it simpler to monitor seedling growth, water them uniformly, and streamline the caring process.
- Portability: Seed trays are lightweight and easy to move around, enabling you to position them optimally for sunlight and care.
Key Considerations
Before you begin planting seeds in containers or trays, keep the following considerations in mind:
- Drainage: Ensure proper drainage in your containers or trays to prevent overwatering and the development of root rot.
- Sterilization: Clean your containers thoroughly before planting to reduce the risk of diseases harming your seedlings.
- Labeling: It’s essential to label your containers or seed trays with the seed type and planting date to track progress accurately.
- Quality Soil: Use a high-quality seed-starting mix to provide your seeds with the nutrients they need for healthy growth.
Watering Can or Spray Bottle
Choosing the Right Tool
When it comes to watering your indoor plants, you have the option of using a watering can or a spray bottle. Both tools have their advantages, so it’s essential to choose the right one based on the specific needs of your plants.
Watering Can
A watering can is a great option for plants that require a larger volume of water at once. The spout of the watering can allows for targeted watering directly to the soil, avoiding wetting the foliage excessively. This is especially useful for plants that are susceptible to fungal diseases when their leaves are wet.
Spray Bottle
A spray bottle is ideal for plants that need more delicate watering or require higher humidity levels. The fine mist produced by a spray bottle helps keep the foliage moist without drowning the plant. It’s also handy for misting air plants or tropical varieties that thrive in humid environments.
Best Practices
- Consistency: Regardless of the tool you choose, consistency in watering is key to the health of your plants. Develop a schedule based on the specific needs of each plant.
- Monitor: Keep a close eye on your plants and adjust your watering routine as needed. Check the soil moisture regularly to prevent under or over-watering.
- Room Temperature: Use water at room temperature to avoid shocking your plants. Cold water can negatively impact their growth and overall health.
Grow Lights or a Sunny Windowsill
The Importance of Light
Light is crucial for the growth of indoor plants as it fuels the process of photosynthesis, allowing plants to produce their own food.
Choosing Between Grow Lights and a Sunny Windowsill
When deciding between grow lights and a sunny windowsill, consider the following:
- Intensity: Grow lights provide consistent and adjustable light intensity, while sunlight can vary based on the location of your windows.
- Duration: Grow lights allow you to control the duration of light exposure, ensuring plants receive adequate light even in darker environments.
- Consistency: Sunny windowsills may not offer consistent light throughout the day, especially in shady areas or during cloudy weather.
Optimizing Light Conditions
To optimize light conditions for your indoor plants:
- Placement: Position plants near a sunny window facing south or southwest for the best sunlight exposure.
- Rotation: Rotate plants regularly to ensure all sides receive equal sunlight and prevent them from leaning towards the light source.
- Supplemental Light: Consider using grow lights as a supplement, especially during winter when natural sunlight is limited.
Preparing Seeds for Planting
When it comes to planting seeds indoors, proper preparation is key to ensuring successful germination and growth. Follow these steps to prepare your seeds for planting:
Gather Your Supplies
- Seeds: Ensure you have high-quality seeds specific to the plants you want to grow.
- Containers: Use clean containers with drainage holes to plant your seeds.
- Seed Starting Mix: Opt for a lightweight, sterile mix for best results.
- Watering Can: Have a watering can with a gentle spout for even watering.
- Labels: Keep track of the types of seeds planted by labeling each container.
Seed Scarification
Some seeds have tough outer shells that need to be broken down to promote germination. Consider scarifying the seeds by lightly sanding them or soaking them in water overnight.
Stratification for Cold-Hardy Seeds
Certain seeds, particularly those of cold-hardy plants, benefit from cold stratification to mimic winter conditions. Place these seeds in a moist medium in the refrigerator for a few weeks before planting.
Moisten the Seed Starting Mix
Before planting, moisten the seed starting mix to a damp consistency, ensuring that it is not soggy. This provides the right environment for seed germination.
Sow the Seeds at the Right Depth
Refer to the seed packet for guidance on planting depth, as different seeds require varying depths for optimal germination. Generally, small seeds are planted shallow, while larger seeds are planted deeper.
Provide Adequate Light and Water
Place the planted seeds in a warm location with adequate light. Ensure the soil is kept consistently moist but not waterlogged to promote healthy seedling growth.
By following these steps, you set your seeds up for success and increase the chances of a bountiful indoor garden.
Checking Seed Viability
When planting seeds indoors, it is crucial to ensure the viability of the seeds you are using to maximize your chances of successful germination. Checking seed viability involves assessing the quality and ability of the seeds to sprout. Below are some methods to determine seed viability:
Visual Inspection
- Seed Size: Larger seeds generally have a higher chance of viability.
- Color and Texture: Healthy seeds are usually plump, firm, and have a consistent color.
- Scent: Some seeds may have a distinct, pleasant aroma indicating their vitality.
Germination Test
The germination test is a reliable way to check seed viability. Follow these steps:
- Prepare: Moisten a paper towel and place a few seeds on it.
- Monitor: Keep the towel damp and observe seed germination over a few days.
- Count: Record the number of seeds that sprout to calculate the germination rate.
Float Test
The float test helps identify seeds that are likely to germinate. Here’s how to conduct the test:
- Place: Drop the seeds into a bowl of water.
- Observe: Viable seeds sink while non-viable seeds float.
- Discard: Remove any floating seeds as they are less likely to sprout.
By performing these viability tests, you can increase the efficiency of your indoor seed planting endeavors and achieve better results.
Pre-soaking Certain Seeds for Better Germination
When it comes to planting seeds indoors, pre-soaking certain seeds can significantly improve germination rates. This simple yet effective method can give your seeds the head start they need to flourish into healthy plants.
Why Pre-soak Seeds?
Pre-soaking seeds helps jumpstart the germination process by softening the seed coat and allowing moisture to penetrate more easily. This can reduce the time it takes for the seeds to sprout and increase the overall germination rate.
Which Seeds Benefit from Pre-soaking?
Not all seeds require pre-soaking, but certain seeds, especially those with hard outer shells or that are naturally slow to germinate, can benefit greatly from this technique. Examples of seeds that often benefit from pre-soaking include beans, peas, morning glories, and squash seeds.
How to Pre-soak Seeds
Follow these steps to pre-soak seeds effectively:
- Clean the Seeds: Remove any debris or damaged seeds before soaking.
- Choose the Right Container: Use a clean container and ensure there is enough room for the seeds to swell.
- Add Water: Cover the seeds with room temperature water and allow them to soak for the specified time.
- Timing: Different seeds require different soaking times. Refer to specific instructions for each plant variety.
- Drain and Plant: After soaking, drain the water and plant the seeds immediately in a suitable growing medium.
Quotes to Inspire
“The act of soaking seeds is ultimately an act of hope – the belief that within each tiny shell lies the potential for new life.”
Cautionary Note
While pre-soaking seeds can be beneficial for many plants, it’s essential not to overdo it. Some seeds may be sensitive to soaking and could rot if left in water for too long. Always research the specific requirements of the seeds you are working with.
Following specific seed planting depth and spacing guidelines
When planting seeds indoors, it is crucial to adhere to specific guidelines regarding seed planting depth and spacing. Following these instructions accurately can significantly impact the success of your indoor gardening endeavors.
Seed Planting Depth
Each type of seed has an ideal planting depth that ensures proper germination and growth. Here are some general guidelines to keep in mind:
- Small Seeds: Plant these seeds at a shallow depth, usually around 1/8 to 1/4 inch deep.
- Medium Seeds: These seeds typically require a planting depth of 1/4 to 1/2 inch.
- Large Seeds: Plant larger seeds deeper, usually around 1/2 to 1 inch deep.
Seed Spacing
Proper seed spacing is essential to allow plants to receive adequate light, water, and nutrients as they grow. Consider the following tips for seed spacing:
- Follow Seed Packet Instructions: Always refer to the instructions on the seed packet for specific spacing recommendations.
- Consider Mature Plant Size: Space seeds based on the anticipated size of the mature plant to prevent overcrowding.
- Thin Seedlings: If seeds are planted too closely, thin out the seedlings once they have sprouted to ensure each plant has enough room to thrive.
Remember, proper seed planting depth and spacing are crucial steps in the indoor gardening process. By adhering to these guidelines, you can set your seeds up for success and enjoy a bountiful harvest down the line.
Planting Seeds Indoors Step-by-Step
Gathering Your Materials
Before starting the indoor seed planting process, it is essential to gather all the necessary materials:
- Seed Trays or Pots: Choose containers that provide ample space for root growth.
- Seed Starting Mix: Opt for a sterile and lightweight mix to promote healthy seedlings.
- Seeds: Select high-quality seeds appropriate for indoor planting.
- Watering Can or Spray Bottle: Ensure a gentle watering method to avoid disturbing seeds.
- Labels: Keep track of the planted seeds with proper labeling.
- Grow Lights: If natural light is insufficient, consider investing in grow lights.
Preparing the Seed Trays
Proper preparation of the seed trays sets the foundation for successful seed germination:
- Fill Trays: Fill the trays with the seed starting mix, leaving a little space at the top.
- Moisten the Mix: Lightly moisten the mix before planting the seeds to provide initial moisture.
- Sow Seeds: Follow the seed packet instructions for seed depth and spacing, then gently press them into the mix.
- Cover Seeds: Sprinkle a thin layer of the mix over the seeds and lightly pat it down.
Providing Optimal Growing Conditions
Ensuring the seeds have the right environment for germination and growth is crucial:Temperature: Maintain a consistent temperature suitable for the specific seeds’ germination requirements. Light: Place the trays in a location with ample natural light or supplement with grow lights. Moisture: Keep the soil consistently moist but not waterlogged to support seedling development. Air Circulation: Provide good air circulation to prevent mold or damping-off diseases.
Caring for Seedlings
Once the seeds have germinated, diligent care is vital to nurture healthy seedlings:
- Watering: Water the seedlings when the top of the soil feels dry, ensuring even moisture.
- Thinning: If multiple seedlings sprout in one cell, thin them to allow proper growth space.
- Fertilizing: Start a weak fertilizer regimen once the seedlings have their first set of true leaves.
- Transplanting: When the seedlings outgrow their trays, transplant them into larger containers.
Filling Containers with Seed Starting Mix
When it comes to filling containers with seed starting mix, there are several key steps to ensure the best environment for your seeds to flourish. Properly preparing your containers with the right mix can significantly impact the success of your indoor gardening ventures. Here’s a guide to help you get started:
Choose the Right Containers
- Select containers with drainage holes to prevent waterlogging, which can be detrimental to seedlings.
- Opt for clean, sterile containers to minimize the risk of diseases affecting your seeds.
- Consider the size of the containers based on the eventual size of the plants.
Selecting the Seed Starting Mix
Using a high-quality seed starting mix is crucial for providing the necessary nutrients and drainage for seedlings. Look for mixes specifically formulated for starting seeds for optimal results.
Filling the Containers
- Fill containers: Fill the containers with the seed starting mix, leaving some space at the top for easier watering.
- Level the mix: Gently tap the containers to settle the mix and level it evenly without compacting it too tightly.
- Moisten the mix: Before planting your seeds, lightly moisten the mix to provide a conducive environment for germination.
Planting the Seeds
Once you have prepared your containers with the seed starting mix, it’s time to plant your seeds. Follow the instructions provided for each type of seed regarding planting depth and spacing to give them the best start possible.
Quote
“The right mix in the right container can set the stage for a flourishing indoor garden.”
By following these steps and paying attention to detail, you can set the stage for successful seed germination and healthy plant growth indoors.
Planting seeds at the correct depth
When it comes to planting seeds indoors, one crucial factor that greatly influences successful germination is planting seeds at the correct depth. Here are some essential tips to ensure your seeds are planted at the optimal depth for healthy growth:
1. Follow seed packet instructions
Each type of seed has specific requirements for planting depth. Always refer to the instructions on the seed packet for accurate information on the ideal depth for planting.
2. Avoid planting seeds too deep
Planting seeds too deep can hinder germination as the seeds may not receive an adequate amount of light or warmth needed to sprout. Make sure to follow recommendations and avoid burying seeds too far below the surface.
3. Sow seeds evenly
Ensure that seeds are sown evenly across the planting area. This helps provide each seed with equal access to resources such as water, nutrients, and light, promoting uniform growth.
4. Use a planting tool
Utilize a planting tool such as a dibber or a seed sower to help maintain consistency in planting depth. These tools can assist in creating uniform planting holes for seeds, optimizing growing conditions.
5. Consider seed size
Smaller seeds generally require shallower planting depths, while larger seeds may need to be placed deeper into the soil. Adapt the planting depth based on the size of the seeds to support successful germination.
By ensuring your seeds are planted at the correct depth, you set the foundation for healthy growth and robust seedling development. Take the time to plant your seeds with care and precision to give them the best start on their journey to flourishing plants.
Watering Seeds Gently After Planting
Proper watering is essential to nurture your seeds after planting. Follow these tips to ensure your seeds receive the right amount of water without causing any harm:
1. Use a Gentle Sprinkler
Tip: Opt for a sprinkler with a gentle spray to avoid disturbing the seeds or causing erosion in the soil.
2. Watering Frequency
It’s crucial to maintain consistent moisture levels. Avoid overwatering, as it can lead to rotting seeds. Monitor the soil’s moisture content regularly.
3. Morning Watering
Tip: Water your seeds in the morning to allow for proper absorption throughout the day. This helps prevent issues like fungal diseases.
4. Avoid Waterlogging
Ensure proper drainage in your containers to prevent waterlogging, which can suffocate the seeds. Choose containers with drainage holes.
5. Seedling Watering Technique
Tip: When watering seedlings, aim for the base of the plants. This directs water to the roots where it is needed most.
By implementing these watering practices, you can support healthy seed growth without risking the delicate balance of moisture needed for optimal germination.
Providing Adequate Warmth and Light Conditions
When it comes to ensuring the successful growth of seeds indoors, providing the right warmth and light conditions is crucial. Here’s a guide to help you create an optimal environment for your seeds:
Temperature Control
- Consistent Temperature: Maintain a stable temperature between 65-75°F during the day and a slightly cooler temperature at night.
- Use of Heat Mats: Consider using heat mats to provide bottom heat, especially for seeds that require warmer soil for germination.
- Avoid Temperature Fluctuations: Fluctuations in temperature can stress the seeds, so ensure a steady environment.
Lighting Requirements
- Quality Light Source: Choose a bright, full-spectrum light source such as grow lights to mimic natural sunlight.
- Duration of Light: Most seeds require 14-16 hours of light per day for optimal growth.
- Proper Distance: Place the light source close enough to prevent seedlings from stretching but not too close to avoid overheating.
Monitoring and Adjustments
Regular monitoring of the temperature and light conditions is essential. Make adjustments as needed based on the specific requirements of the seeds you are growing.
Creating a nurturing environment with adequate warmth and light will set the foundation for healthy seedling growth.
Caring for Seedlings
Creating the Ideal Environment
Ensuring your seedlings thrive requires providing them with the perfect conditions:
- Light: Place seedlings in a location with ample sunlight or use grow lights to supplement light needs.
- Temperature: Maintain a consistent temperature range of 65-75°F for optimal growth.
- Humidity: Keep the air around seedlings moist but not soggy; a humidity dome can help regulate moisture levels.
Watering Wisely
Proper watering is essential for the health of your seedlings:
- Frequency: Water carefully to keep the soil consistently damp but not waterlogged.
- Method: Use a gentle watering can or misting spray to avoid disturbing delicate roots.
- Signs of Overwatering: Watch for wilting or yellowing leaves, which could indicate excessive watering.
Feeding Your Seedlings
Provide essential nutrients to promote strong growth:
- Transplanting: When seedlings have their first set of true leaves, transplant them into larger containers with nutrient-rich soil.
- Fertilizing: Use a diluted fertilizer solution sparingly to avoid overwhelming young plants.
- Organic Options: Consider organic fertilizers for a gentle and sustainable approach to feeding your seedlings.
Maintaining Proper Humidity Levels
Importance of Proper Humidity
Ensuring the right humidity levels is crucial for the successful growth of indoor plants. Too much or too little humidity can adversely affect plant health and development.
Measuring Humidity
Use a hygrometer to monitor humidity levels consistently. Most indoor plants thrive in humidity levels between 40% to 60%.
Increasing Humidity
- Grouping plants together can create a microclimate with higher humidity levels.
- Using a humidifier or pebble tray filled with water beneath the plants can help maintain proper humidity.
Decreasing Humidity
- Good air circulation can prevent excess humidity accumulation.
- Air conditioning or a dehumidifier can help reduce humidity levels if they are too high.
Humidity Adjustments for Different Seasons
During the colder months, when indoor heating reduces humidity, mist plants occasionally or use a humidifier. In warmer seasons, increase ventilation to prevent humidity levels from getting too high.
Rotating Seedlings to Promote Even Growth
When cultivating seedlings indoors, one crucial aspect to consider is the promotion of even growth. Rotating your seedlings regularly can significantly impact their development, ensuring they receive adequate light exposure and grow uniformly.
The Importance of Rotation
Rotating seedlings helps prevent them from leaning or reaching excessively towards a light source. By providing consistent light exposure from all angles, each plant receives an equal opportunity to thrive and develop properly.
How to Rotate Seedlings Effectively
Here are some key tips to rotate your seedlings effectively:
- Frequency: Rotate your seedlings daily to ensure all sides receive equal light.
- Direction: Turn the seedlings 90 to 180 degrees each time to guarantee uniform growth.
- Consistency: Maintain a regular rotation schedule to promote healthy and robust plants.
Ensuring Proper Development
By implementing a rotation routine for your seedlings, you create an environment where all plants can flourish without competition for light. This simple yet effective practice can make a significant difference in the overall health and vitality of your indoor garden.
Feeding Seedlings with a Diluted Fertilizer Solution
Ensuring that your seedlings receive proper nutrition is vital for their healthy growth. One effective method to provide them with essential nutrients is by feeding them a diluted fertilizer solution. Here’s how you can go about it:
Choosing the Right Fertilizer
Select a fertilizer that is specifically formulated for seedlings, preferably one that is balanced and water-soluble. Avoid using strong fertilizers that can harm delicate young plants.
Preparing the Diluted Solution
Follow the instructions on the fertilizer package to mix the appropriate amount of fertilizer with water. Typically, a ratio of 1/4 teaspoon of fertilizer per gallon of water is suitable for seedlings.
Application Techniques
- Gently water the seedlings with the diluted fertilizer solution, ensuring that the soil is moist but not waterlogged.
- Avoid getting the fertilizer solution on the leaves to prevent burning.
- Apply the solution every two to four weeks or as recommended on the fertilizer label.
Observing Plant Reactions
Monitor your seedlings closely after fertilizing them. Look for signs of over-fertilization such as wilting, yellowing leaves, or stunted growth. Adjust the feeding frequency if needed.
Feeding your seedlings with a diluted fertilizer solution can provide them with the nutrients they need for strong and healthy development.
Transplanting Seedlings
When to Transplant
Transplanting seedlings is a crucial step in their growth journey. It is typically recommended to transplant seedlings when they have developed their first set of true leaves.
Preparing for Transplant
Before transplanting, ensure that the soil is moist but not waterlogged. Gently remove the seedlings from their current containers, being careful not to damage the roots.
Transplanting Process
- Make a Hole: Create a hole in the soil of the new container that is deep enough to accommodate the roots of the seedling.
- Planting: Carefully place the seedling in the hole and cover its roots with soil, pressing gently to secure it in place.
- Watering: After transplanting, give the seedling a thorough watering to help it settle into its new environment.
Post-Transplant Care
After transplanting, it is important to provide the seedlings with adequate sunlight and water. Monitor their growth closely to ensure they adapt well to their new surroundings.
Harden off seedlings before transplanting outdoors
Ensuring the successful transition of your indoor seedlings to the outdoor environment is crucial for their growth and overall health. Hardening off your seedlings is a gradual process that helps acclimatize them to the outdoor conditions, preparing them for transplanting into your garden.
What is hardening off?
Hardening off is the process of gradually exposing your indoor seedlings to the outdoor environment, including sunlight, wind, and fluctuating temperatures. This process helps prevent shock and stress to the plants when they are finally transplanted outside.
How to harden off seedlings
- Start early: Begin the hardening off process about one to two weeks before you plan to transplant your seedlings outdoors.
- Gradual exposure: Place your seedlings outdoors in a sheltered, shady spot for a few hours each day, gradually increasing the time and exposure to sunlight and outdoor conditions.
- Monitor weather conditions: Be mindful of weather forecasts and avoid exposing your seedlings to extreme conditions such as strong winds, heavy rain, or intense sunlight during the initial stages of hardening off.
- Protect at night: Bring your seedlings indoors or place them in a protected area overnight to shield them from chilly temperatures.
- Water and fertilize accordingly: Pay close attention to the moisture levels of the soil and adjust your watering schedule as needed. Avoid over-fertilizing during the hardening off period.
Signs of readiness for transplanting
Before transplanting your seedlings outdoors, look for signs of readiness such as sturdy stems, vibrant green leaves, and roots that have filled out their containers. These indicators suggest that your seedlings have successfully acclimated to the outdoor environment and are ready for planting in your garden.
Remember, a gradual and careful approach to hardening off your seedlings will help ensure their survival and promote healthy growth once they are transplanted outdoors.
Plant Seedlings in Prepared Garden Beds or Containers
Preparing the Garden Beds
Before planting seedlings in your garden beds, it is crucial to ensure that the soil is adequately prepared. Follow these steps:
- Clear the Area: Remove any weeds, rocks, or debris from the garden bed.
- Loosen the Soil: Use a garden fork to loosen the soil to a depth of at least six inches.
- Amend the Soil: Add compost or organic matter to enrich the soil with nutrients.
- Level the Surface: Smooth out the soil surface to create a uniform planting area.
Planting Seedlings
Once your garden beds are prepared, it’s time to plant your seedlings with care:
- Dig Planting Holes: Dig holes in the soil that are slightly larger than the root ball of the seedling.
- Remove Seedlings Gently: Carefully remove the seedlings from their containers, taking care not to damage the roots.
- Place Seedlings: Plant each seedling in a hole and gently backfill with soil, patting it down lightly.
- Water Thoroughly: After planting, water the seedlings thoroughly to help them establish in their new environment.
Using Containers for Planting
If you prefer to plant seedlings in containers, follow these steps for success:
- Select Appropriate Containers: Choose containers with drainage holes to prevent waterlogging.
- Fill with Potting Mix: Fill the containers with a high-quality potting mix, leaving some space at the top for watering.
- Plant Seedlings: Gently transplant seedlings into the containers, ensuring they are at the same depth as they were in the original containers.
- Provide Adequate Care: Place the containers in a sunny spot, water regularly, and feed with a balanced fertilizer as needed.
Water seedlings thoroughly after transplanting
Transplanting seedlings is a critical stage in their growth journey. After carefully moving them to their new pots, watering correctly is essential to ensure their survival and healthy development.
When to Water
Immediately after transplanting, seedlings should be watered gently but thoroughly. The goal is to keep the soil evenly moist without causing waterlogged conditions.
How to Water
Aim to water the seedlings directly at the base to reach the root zone efficiently. A gentle stream of water can help settle the soil around the roots while avoiding disturbance to the delicate plants.
Monitoring Moisture Levels
Regularly check the moisture levels in the soil to prevent overwatering or drying out. Insert your finger into the soil up to the first knuckle – if it feels dry, it’s time to water again.
Quenching Thirst
Seedlings have different water requirements depending on the stage of growth and species. Adjust your watering schedule based on the individual needs of the plants to promote optimal health.
Remember, proper watering is a key element in nurturing seedlings post-transplantation. Monitor, adjust, and care for your plants with diligence to support their journey towards maturity.
Troubleshooting Common Seedling Issues
When nurturing seedlings, encountering challenges is not uncommon. Understanding common issues and their solutions is crucial for successful indoor seed starting. Below are some troubleshooting tips to help you address common seedling problems:
Potting Mix Problems
- Dampening off: Ensure proper drainage in the seed trays to prevent excess moisture accumulation.
- Poor germination: Use a high-quality, sterile seed starting mix to avoid issues with disease or pests.
- Compacted soil: Gently aerate the soil with a fork to improve air circulation.
Lighting Issues
- Leggy seedlings: Provide adequate light to prevent seedlings from stretching towards the light source.
- Yellowing leaves: Adjust the distance between the light source and seedlings to avoid light burn.
Temperature Troubles
- Stunted growth: Maintain consistent temperature levels for optimal seedling development.
- Wilting: Avoid placing seedlings in drafty areas or near heat sources that could cause temperature fluctuations.
Watering Woes
- Overwatering: Allow the soil to dry slightly between waterings to prevent root rot.
- Underwatering: Ensure seedlings receive adequate moisture without waterlogging the soil.
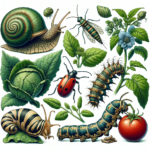
Pest Problems
- Aphid infestation: Introduce natural predators like ladybugs or use insecticidal soap as a safe pest control measure.
- Fungal issues: Improve air circulation around seedlings and avoid overhead watering to deter fungal growth.
Addressing Leggy Seedlings
When seedlings start to become leggy, it can be a sign of inadequate growing conditions. Leggy seedlings are those that have stretched out abnormally tall and thin, often reaching towards the light source with weak stems.
Causes of Leggy Seedlings
Several factors can contribute to leggy seedlings:
- Insufficient light: Seedlings need ample light to grow compact and sturdy.
- High temperatures: Excessive heat can cause rapid vertical growth.
- Overcrowding: When seedlings are too close together, they compete for light and stretch out.
Addressing the Issue
To tackle leggy seedlings, consider the following:
- Provide Adequate Light: Place seedlings under a grow light for 12-16 hours a day, keeping it a few inches above the plants.
- Adjust Temperature: Maintain a moderate temperature to promote healthy growth without excessive stretching.
- Spacing: Ensure seedlings have ample space to grow without crowding each other.
- Transplanting: Carefully transplant leggy seedlings into deeper containers burying the stem up to the seed leaves.
- Wind Exposure: Gently brush your hand over the seedlings daily to simulate the wind and strengthen the stems.
- Pruning: Trim off the top growth to encourage bushier growth and prevent further stretching.
- Proper Ventilation: Ensure good air circulation around your seed trays to discourage mold formation.
- Avoid Overwatering: Excess moisture can lead to mold growth. Water your seeds carefully, allowing the soil to dry out slightly between waterings.
- Use Clean Containers: Start with sterilized seed trays and pots to prevent introducing mold spores into your growing environment.
- Remove Affected Plants: Quarantine any trays or pots that show signs of mold. Remove the affected plants to prevent further contamination.
- Improve Air Circulation: Increase ventilation around the affected plants to discourage mold growth.
- Adjust Watering: Allow the soil to dry out slightly and adjust your watering schedule to prevent excess moisture.
- Cinnamon Powder: Sprinkle a bit of cinnamon powder on the soil surface to help inhibit mold growth.
- Chamomile Tea: Use chamomile tea as a natural antifungal spray to protect your seedlings.
- Vinegar Solution: A diluted vinegar solution can help combat mold on the surface of the soil.
- Water: Ensure your seeds receive adequate but not excessive water. Too much water can lead to rot, while too little can cause the seeds to dry out.
- Light: Provide sufficient light for your seedlings. Consider using grow lights if natural light is limited.
- Temperature: Maintain consistent temperatures for optimal germination and growth.
- Handle with Care: Transplant seedlings gently to avoid damaging their delicate roots.
- Harden Off: Acclimate your plants to outdoor conditions gradually before transplanting them into the garden.
- Germination Rates: Track how well each type of seed germinated for future reference.
- Growth Progress: Monitor the growth of your seedlings to identify any issues early on.
- Track Progress: Recording the growth and development of your indoor plants allows you to monitor their progress over time. You can note any changes, such as leaf discoloration, flowering patterns, or growth spurts, to identify patterns and adjust your care regimen accordingly.
- Learn from Mistakes: By documenting your successes and failures, you can learn from past mistakes and refine your planting techniques. Understanding what works well and what doesn’t can help you make informed decisions in the future.
- Remember Planting Details: Jotting down important information such as planting dates, potting mix used, watering schedule, and sunlight exposure can serve as a reference guide for each plant in your collection. This information can be invaluable for troubleshooting issues or replicating successful growth conditions.
- Enhance Plant Care Knowledge: The act of journaling encourages you to reflect on your gardening practices and research plant-specific care tips. Over time, you can develop a deeper understanding of your plants and improve your horticultural knowledge.
- Be Consistent: Make it a habit to regularly update your gardening journal with new observations, tasks completed, and any changes in your plants.
- Include Photos: Visual documentation can be a powerful tool. Take photos of your plants at different stages of growth to visually track their progress.
- Use Descriptive Language: Describe the appearance of your plants, their health status, and any abnormalities you notice in detail. This will help you accurately recall past events and make informed decisions.
- Reflect and Plan: Take time to reflect on your entries, identify trends, and plan future actions based on your observations. Setting goals and making adjustments can lead to continuous improvement in your indoor gardening practices.